
7/24/2014
Photographing the Milky Way
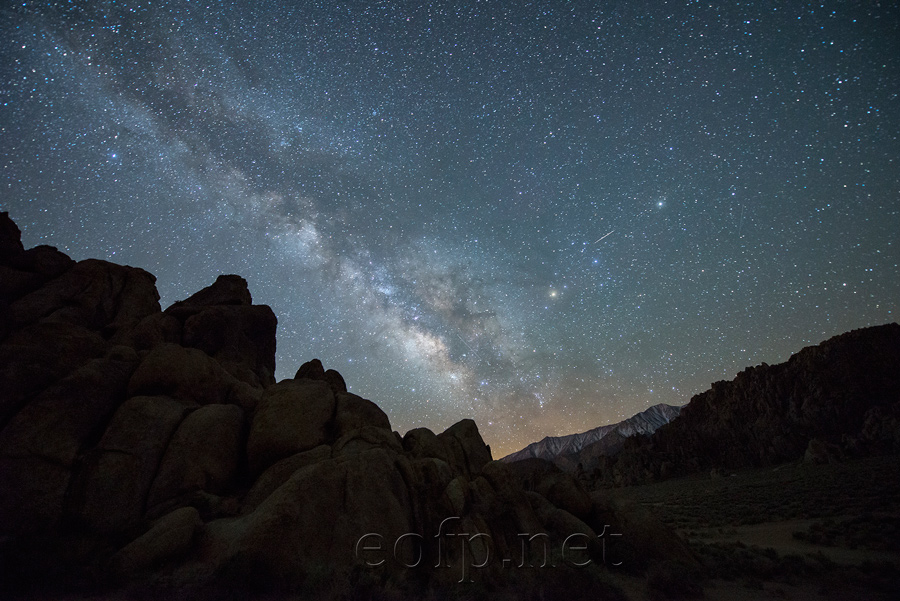
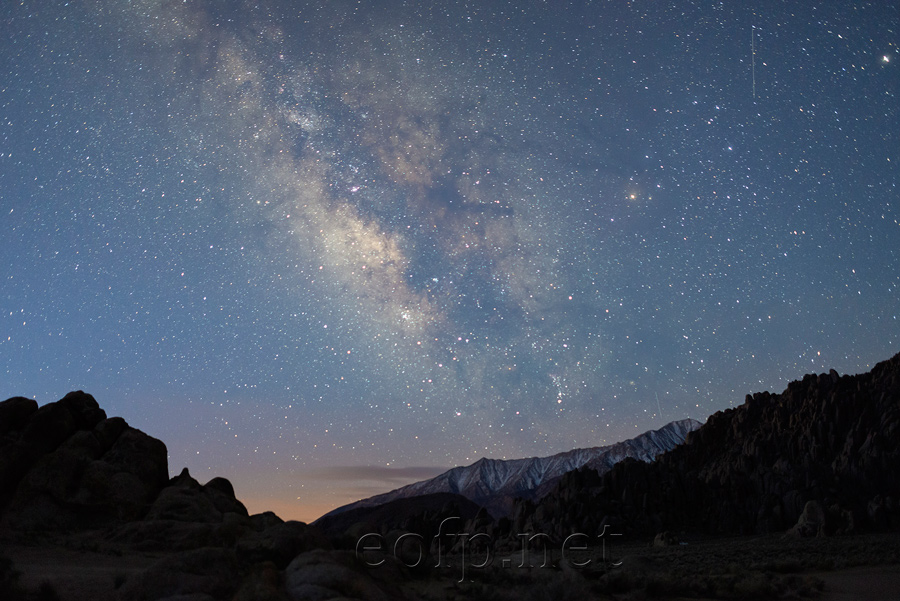
Alabama Hills, California
I'm writing this to give a few practical tips for getting decent shots of the Milky Way more or less straight out of the camera. Most of the amazing images of the Milky Way you've seen have been heavily manipulated in Photoshop or other programs. Some of the manipulations are simple enhancements like brightening shadows and noise reduction. Others are more fundamental and involve combining multiple exposures with stacking and other techniques. I'm not very familiar with those techniques and wont go into them here. It's important to realize though that they are widely used.
When and Where:
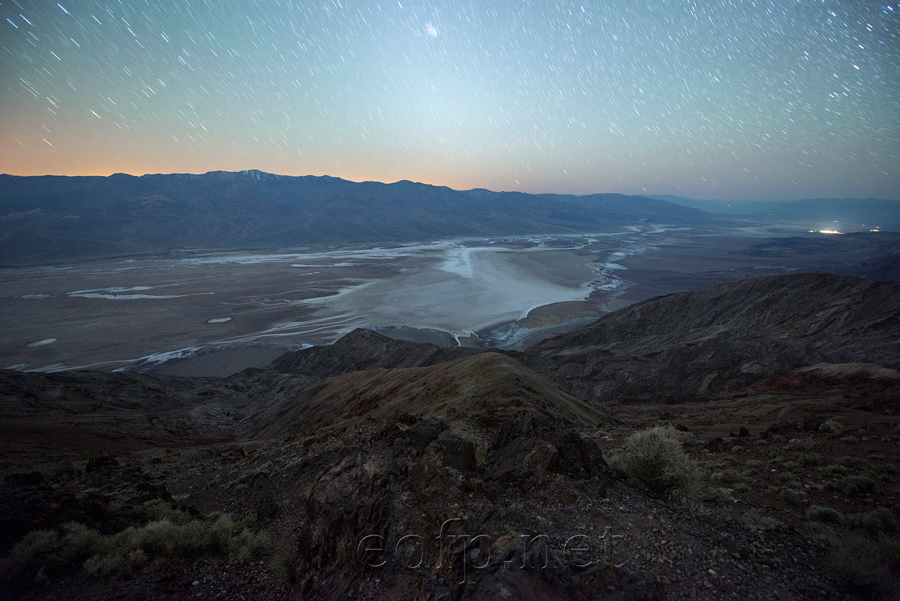
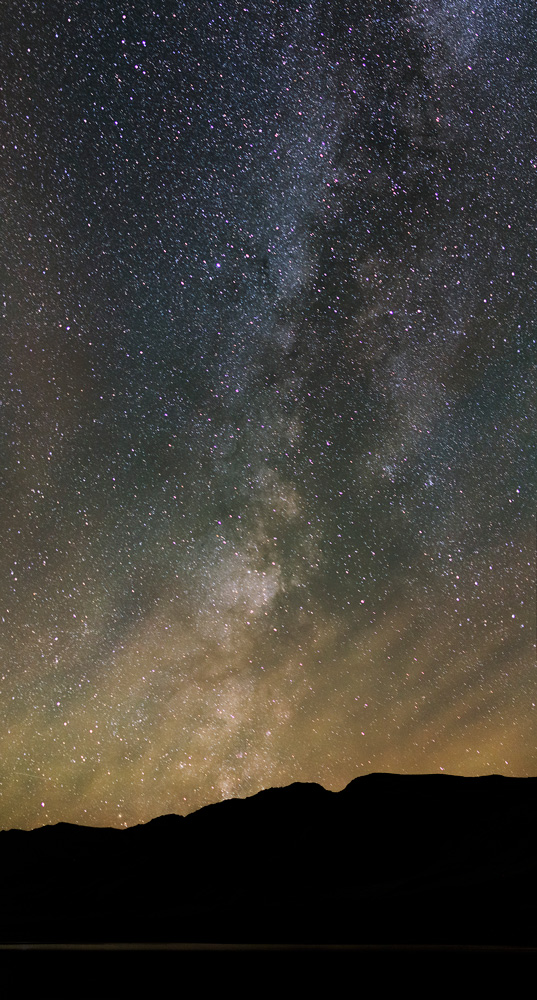
Most articles on this subject dwell on hardware. This is important and I'll go into it below. But it's also important to know where and when to look for the Milky Way. Earth is in the Milky Way so the Milky Way is visible anytime of night and anytime of the year. But all of the dramatic shots of the Milky Way you've seen are of the central and brightest part of the Milky Way. In the Northern Hemisphere this part of the Milky Way is only visible in the early morning. It is at it's most dramatic just before astronomical twilight at all times of the year. The photo below was taken in Death Valley National Park at around 10PM in April. This is the less dramatic outer part of the Milky Way and it isn't all that photogenic. The photo at the top of this page was taken around 5AM, also in April and includes part of the central Milky Way. In the Northern Hemisphere, the central part of the Milky Way is in the southern sky. The brightest part of the Milky Way is higher in the sky in the summer than in the winter. But in the summer the sun rises earlier in the morning. So the best times of year to photograph the Milky Way are mid to late spring and early to mid autumn. Going to a place with minimal light pollution on the southern horizon is important. Even minimal light pollution will show up in long exposures. In the example above there is clearly light pollution on the horizon. I was not able to see it though until after I took the picture.
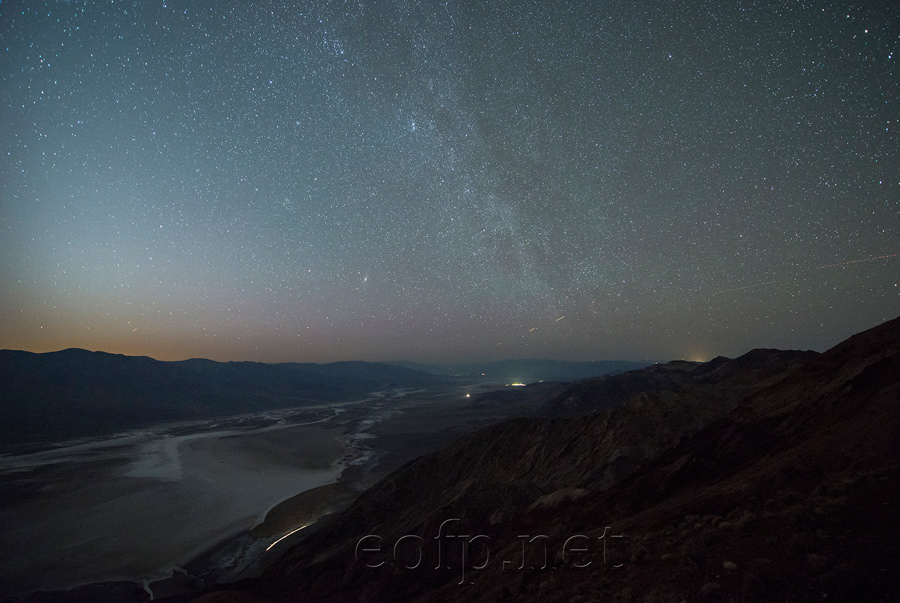
Dante's Viewpoint, Death Valley National Park
Escaping light pollution completely in the United States is almost impossible but places with minimal light pollution aren't that hard to find. This dark sky map at darksitefinder.com is a good general guide. The map does not include many minor light sources though so it's not a hundred percent accurate. Having a clear sky is also important. Clouds obviously obscure the stars as does smoke, haze and dust. These clear sky charts predict cloud cover and general atmospheric clarity for any location in the US. Mountains, trees and other solid objects that block the southern horizon can help reduce the impact of light pollution on your photos. They also block your view of the lower part of the sky. Generally though, having something between you and the southern horizon is a good idea.
Moonlight can ruin attempts to photograph the night sky. The photo below was taken of the southern sky in Death Valley at around 4AM. The moon was about 50% illuminated on the night I took the picture. In this photograph it has almost completely washed out the brightest part of the Milky Way. The moon was also up when I took second picture below. In that case the moon was only 10% or so illuminated. It completely blew out the exposure but I don't think it ruined the shot. Venus is to the right of the moon in the second picture down and Venus also blew out the exposure. The orange sky on the left horizon in the second picture down is the beginning of twilight. The orange sky on the right is light pollution from a town about 20 miles away. Planning your trip to a dark sky location around the phases and rise and set times of the moon is important. Try to pick dates when the illuminated moon will not be in the sky in the early morning.
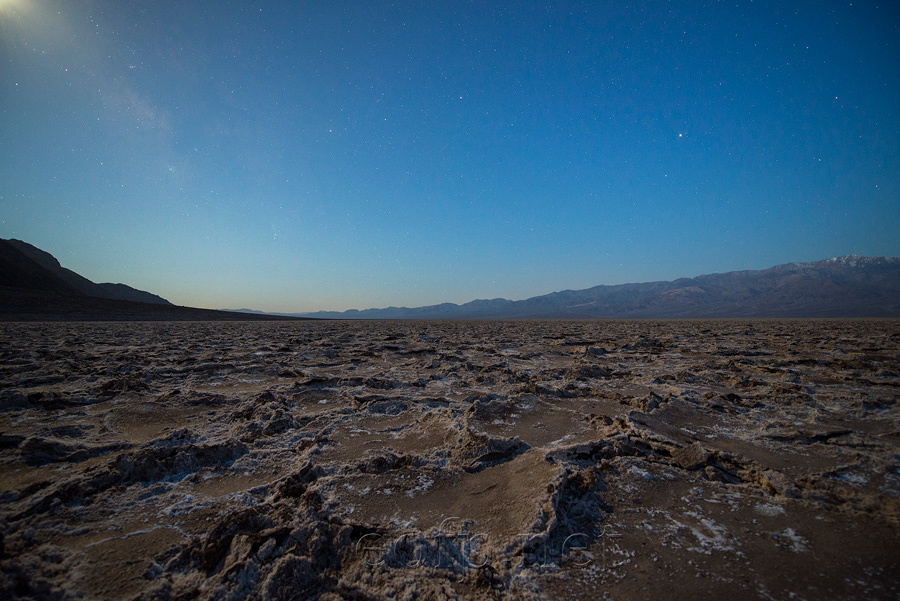
Badwater Basin, Death Valley National Park
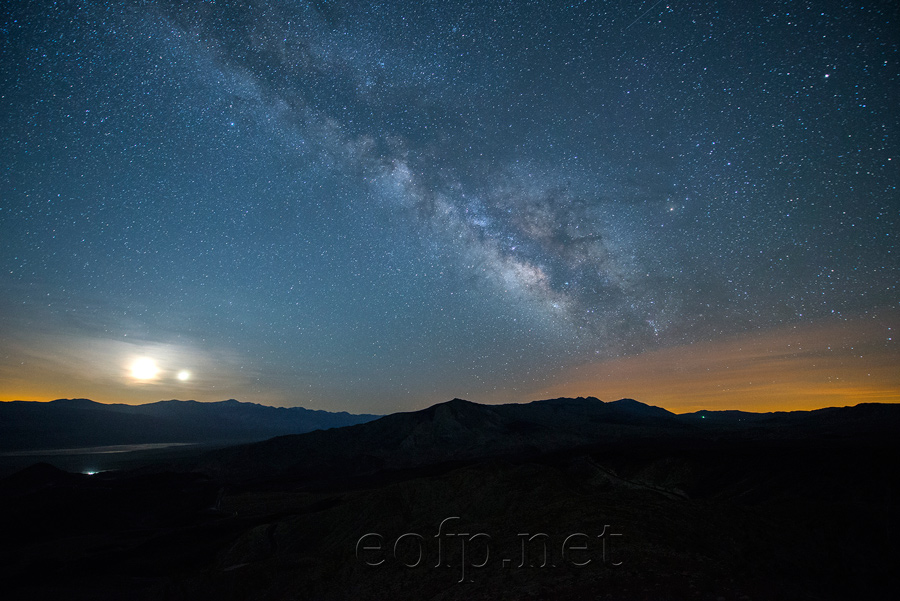
Father Crowley Viewpoint, Death Valley National Park
Camera:
It might be possible to get a shot of the Milky Way with one of the higher end compact cameras. I've never tried. In general though you will need a DSLR camera with a tripod. Full frame DSLRs are much better than crop sensor DSLRs because the larger sensors enable them to capture more light. It is possible though to take decent pictures of the Milky Way with affordable crop sensor cameras like the $476 Nikon D3200. The photo at the bottom of this page was taken with a Nikon D5100. An updated version of that camera, the Nikon D5200 is currently selling for $700. The key specification to look for in a camera is low noise at high ISO. Some cameras have high ISO settings that are practically useless because of how noisy images taken at those settings are. The best cameras on the market as of summer 2014 are able to produce acceptable photos at around 3000 ISO. The D5200's highest acceptable ISO is 1,284. The camera I took the above photos with was the Nikon D600. The slightly updated version of that camera - the Nikon D610 is currently selling for $2,400 with the kit lens. The D600 and D610 take acceptable photos at 2,980 ISO. Snapsort.com is one of several sites that allow you to compare cameras based on the low noise at high ISO spec.
Having wide dynamic range is also very helpful. This is the difference between the brightest and darkest light a camera can record in a given exposure. If your camera doesn't have much dynamic range then you wont be able to do much lightening of dark areas in software. To preserve your camera's dynamic range you need to shoot raw images. The Nikon D600 has 14.2 stops of dynamic range which I think is pretty good.
Alabama Hills, California
Lenses:
There are a few things to consider when buying or selecting a lens for photographing the night sky. The most important is the maximum aperture. You definitely want something that opens to f2.8 or better. The photo above was taken with a Nikon 28mm f1.8G which sells for $700. The photo on the top of this page was taken with a Nikon 14-24mm f2.8G which sells for almost $2,000. Fixed focal length lenses are generally cheaper and higher quality than zoom lenses.
The field of view or focal length of the lens is also important. On a full frame camera anything 35mm or wider captures enough of the Milky Way to make a decent photo. The equivalent for a crop sensor (DX) camera is about 24mm. Ultra wide angle lenses 14mm or wider are great and allow you to capture landscape elements as well as the sky.
Many lenses are badly affected by a phenomena called coma when wide open. This makes them useless for night sky photography. Lens coma makes points of light smear and blur at the edges of the image. Basically stars end up looking like birds as in the example below. Many lenses (even expensive ones) have this problem which is really only a problem when photographing stars. The Nikon 14-24mm f2.8G and the Nikon 28mm f1.8G I mentioned above have very little coma when wide open. The Nikon 50mm f1.8G and the Nikon 35mm f1.8G also have very little coma when wide open and are actually better in this respect than the more expensive f1.4G lenses. The Sigma 35mm f1.4 is a great lens for night sky photography. The Samyang/Rokinon lenses have a great reputation but I've never used them. You should definitely research coma on any given lens before buying it for night sky photography.
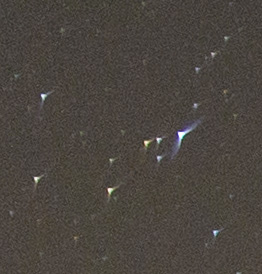
Lens coma with the Nikon 50mm f1.4G
Camera Settings:
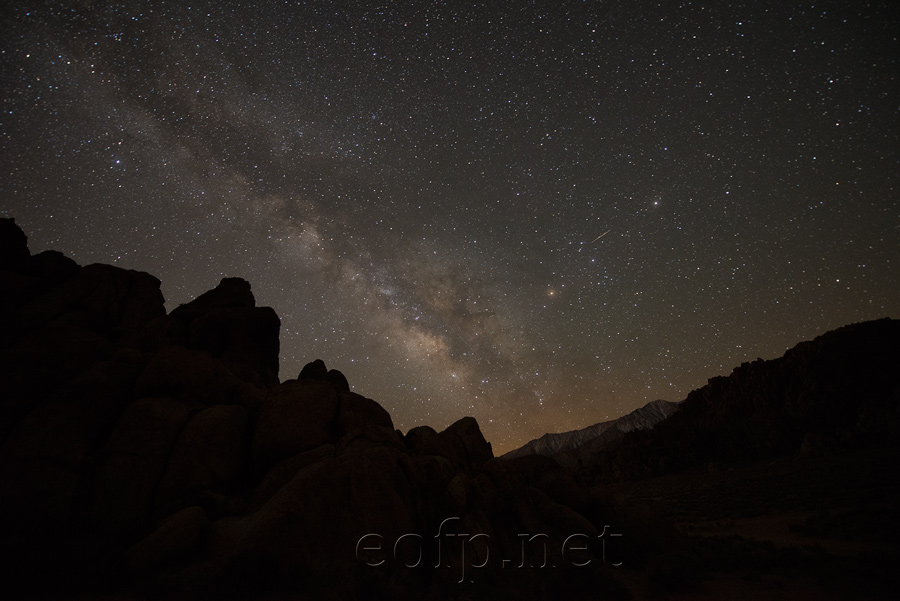
Long exposures are necessary to capture the light of stars but exposures that are too long capture the movement of the stars resulting in trails. The shutter was open for a little over 2 minutes when I took the photo below (note the trailing stars). In order to resolve stars as pinpoints of light there is a maximum acceptable length of exposure for any given focal length. Wider angle lenses can be left open longer than more telephoto lenses. A good exposure length for a 14mm lens is about 30 seconds. Beyond that stars begin to look like smears. For a 28mm lens it's about 20 seconds. For a 35mm lens it's about 12-15 seconds. Since you can't increase the exposure time beyond that, the only way to increase exposure is to have a wider aperture or higher ISO. At 3200 ISO the exposure for the times mentioned above is acceptable but dark for a 14mm lens at f2.8 and 28mm and 35mm lenses at f1.8. If your camera is noisy at 3200 ISO and your aperture is wide open, there really isn't much more you can do to improve your images besides using software after the fact.
You don't really need a great tripod for a 30 second exposure unless it's really windy. A cheap one works fine for me. But you definitely need a tripod. The wind is fortunately usually the calmest in the early morning which is the best time to photograph the night sky. Having a remote release is extremely helpful. The cheap Nikon infrared remote works great for me. I also frequently use a stopwatch app on my phone to time exposures in excess of 30 seconds which is the longest automatic setting on my camera.
Focusing the camera is always kind of a struggle. Auto focus doesn't work at night. I always set my camera to manual focus and set the lens to the middle of the infinity symbol on the focus ring. Focusing on one of the brightest stars in the sky while in live view and zooming in (digitally) also works.
Dante's Viewpoint, Death Valley National Park
Post Processing:
I don't like doing much post processing on my photos. I usually like to leave it at a little levels adjustment and straightening. Night sky photography often requires a little more work. The photo below is the same as the one at the top of this page exactly how it came out of the camera. The auto white balance on every camera I've ever owned has failed in low light situations. So one of the things I always do with night sky photos is adjust the white balance. Shooting and working with raw images makes this infinitely easier. In this case the camera recorded the white balance as 4400k. I think 2800k looks much better. Lightening the shadows is another thing I almost always do. This is another thing you can only do successfully if you're working with raw images (not jpegs). Levels and a little sharpening and noise reduction are the only other things I did with the photo at the top of the page. The hardest part is usually getting the white balance right.
Vignetting is a problem or maybe a feature when using any lens when it's wide open. This is the darkening of corners. Since night sky photos are almost always under-exposed there isn't much you can do to fix vignetting that I know of. Dark areas are usually too noisy to lighten significantly.
Alabama Hills, California
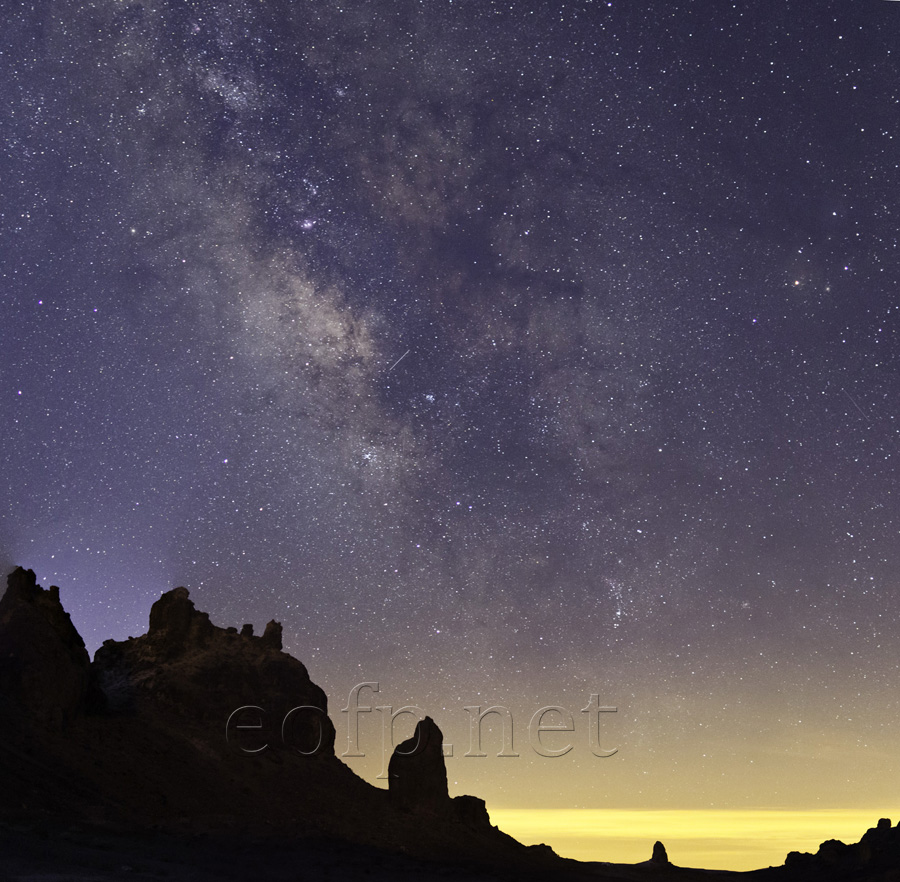
Sunrise at Trona Pinnacles California
Mann Lake Campground
All content on these pages Copyright Mark Hedlund 2012-2019. All rights reserved. Use in school projects and with links on social media is always okay. Please send me an email to request permission for any other use: hedlunch@yahoo.com Non-exclusive commercial publication rights for most photos is $25 per image.